Integrating the Procreate Brushset - Drawing Brushes into Your Digital Workflow
In the evolving landscape of digital illustration, the efficiency of your toolkit often dictates the quality and speed of your output. For artists, designers, and content creators working within the iPad ecosystem, selecting the right assets is not merely an aesthetic choice but a strategic workflow decision. The Procreate Brushset - Drawing Brushes represents a curated collection designed to streamline the creative process, offering forty-five unique tools that bridge the gap between traditional media feel and digital flexibility. Understanding how to integrate this specific brush set into your broader artistic pipeline can significantly enhance productivity, consistency, and final output quality.
The Role of Specialized Brush Sets in Modern Design
Digital art software like Procreate provides a robust foundation, but its default libraries are often generalized to accommodate a wide range of users. Professionals and serious hobbyists frequently find themselves seeking specialized tools that cater to specific textures, lighting effects, or line qualities. This is where a targeted asset like the Procreate Brushset - Drawing Brushes becomes essential. It is not just a collection of stamps; it is a functional extension of your artistic intent.
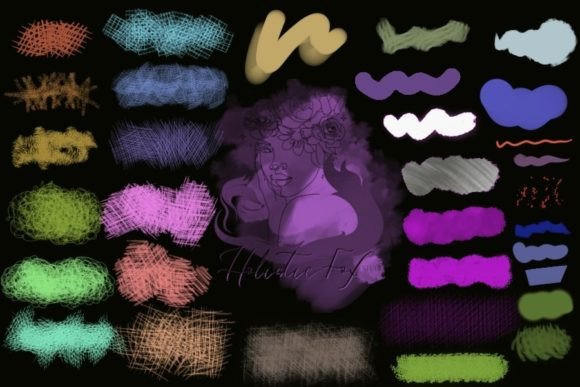
This zip file contains a diverse array of brushes categorized by utility: outline and shadow, neon and glow, coloring and sketching, texture and hatching, and glitter and metallic. By having these specific functionalities pre-configured, you eliminate the time-consuming trial and error associated with tweaking default settings. Instead of spending hours adjusting opacity, flow, and grain to achieve a specific grunge texture or a clean neon glow, you can select the appropriate tool and focus immediately on composition and narrative.
Pre-Production: Preparation and Compatibility
Before diving into creation, successful integration begins with proper installation and organization. The Procreate Brushset - Drawing Brushes is distributed as a .brushset file, compatible with all versions of Procreate. This universal compatibility ensures that whether you are using an older iPad model or the latest Pro hardware, the tools will function as intended.
The installation process is straightforward but requires attention to detail to ensure smooth access later. You can download the file directly onto your iPad or use AirDrop from another Apple device. Once the file is on your device, tapping it will automatically open Procreate and import the set into your Brush Library. For professionals managing multiple projects, it is advisable to create a dedicated folder within your brush library for this set. This organizational step prevents clutter and allows for quick retrieval during high-pressure deadlines.
It is important to note that preview images are not included in the zip file. Therefore, taking a few minutes to test each of the forty-five brushes on a blank canvas before starting a client project is a crucial quality control step. Create a reference sheet where you label each brush by its function—such as "Grunge Texture" or "Neon Glow"—to build muscle memory and reduce decision fatigue during the actual drawing phase.
Execution: Enhancing the Creative Process
During the execution phase of a project, the Procreate Brushset - Drawing Brushes serves multiple roles depending on the stage of your artwork. The set is described as "functionally smart," meaning the brushes respond dynamically to pressure and tilt, mimicking the behavior of physical media while retaining digital advantages.
Sketching and Outlining
The initial stages of any illustration rely heavily on confident lines. The sketching and outline brushes in this set provide the necessary variation in line weight to create dynamic compositions. Unlike static vector lines, these brushes offer organic imperfections that add character to your work. When combined with the shadow brushes, you can quickly establish depth and form without switching layers or tools excessively. This fluidity keeps you in the "flow state," a critical psychological zone for creative productivity.
Texturing and Backgrounds
One of the most time-consuming aspects of digital art is creating interesting backgrounds and textures. Default flat colors often look sterile. The texture and hatching brushes included in this set allow you to introduce grit, paper grain, and cross-hatching patterns instantly. This is particularly useful for editors, bloggers, and marketers who need to create engaging visual content quickly. By applying these textures on separate layers with blending modes like Multiply or Overlay, you can add complexity to simple illustrations, making them appear more handcrafted and premium.
Special Effects: Neon, Glow, and Metallic
For projects requiring high visual impact—such as social media graphics, album covers, or promotional materials—the neon, glow, glitter, and metallic brushes are invaluable. These tools simulate light emission and reflective surfaces effectively. Instead of manually painting highlights and adjusting layer styles, you can use these brushes to add immediate sparkle or luminescence. This capability is especially relevant for entrepreneurs and small business owners who manage their own branding; these effects can make product mockups or digital ads stand out in crowded feeds.
Post-Production and Workflow Integration
After the primary drawing is complete, the Procreate Brushset - Drawing Brushes continues to offer value in the refinement stage. The coloring brushes are designed for smooth application, allowing for efficient blocking in of colors and subtle gradients. This reduces the need for complex masking techniques for simple color transitions.
Furthermore, because these brushes are part of a cohesive set, they share a consistent aesthetic language. This consistency is vital for maintaining brand identity or stylistic coherence across a series of illustrations. For educators and publishers creating instructional materials, using a unified brush set ensures that all diagrams and figures look like they belong to the same document, enhancing professional credibility.
Practical Tips for Long-Term Use
To maximize the return on investment for this digital asset, consider the following implementation strategies:
- Layer Management: Use specific brushes on dedicated layers. For example, keep all neon glow elements on a single layer set to "Add" or "Screen" mode. This allows for non-destructive editing if you need to adjust intensity later.
- Customization: While the brushes are pre-configured, Procreate allows for further tweaking. If a specific hatching pattern is too dense for your style, adjust the spacing in the brush studio. Save these adjustments as new variants to expand your toolkit without losing the original presets.
- Workflow Speed: Assign your most frequently used brushes from this set to QuickShape gestures or side shortcuts. This reduces menu navigation and keeps your hands on the screen, improving ergonomics and speed.
- Backup: Since the file is a local download, ensure you back up the
.brushsetfile to cloud storage. This safeguards your workflow against device loss or software resets.
Conclusion
The Procreate Brushset - Drawing Brushes is more than a collection of digital tools; it is a workflow enhancer designed for those who value both creativity and efficiency. By providing forty-five specialized brushes covering everything from basic sketching to complex metallic textures, it addresses common pain points in digital illustration. Whether you are a freelancer meeting tight deadlines, an educator creating engaging visuals, or a hobbyist exploring new styles, integrating this set into your Procreate environment can streamline your process. The key lies in preparation, organized usage, and understanding how each brush interacts with your existing techniques. With proper implementation, this brush set becomes an indispensable part of your digital arsenal, helping you complete projects with style, creativity, and ease.