Mastering Urban Aesthetics with Procreate Textures Brushes Bricks Walls
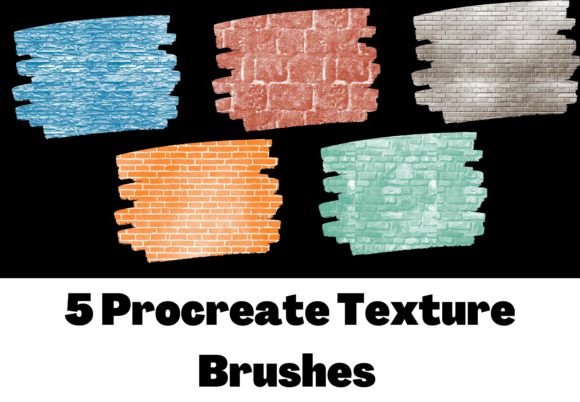
Digital illustration often suffers from a common pitfall: it looks too clean. While the crisp lines of vector art have their place, many creators crave the grit, history, and tactile warmth of physical materials. This is where Procreate Textures Brushes Bricks Walls becomes an indispensable tool in your digital arsenal. Designed specifically for iPad and iPhone users, this pack of five specialized brushes allows you to inject authentic architectural character into your work without leaving your studio.
However, simply downloading a brush set does not guarantee professional results. Many artists, from enthusiastic beginners to seasoned freelancers, overlook the nuances of texture application. They treat these tools as simple stamps rather than dynamic painting instruments. Understanding how to properly leverage pressure sensitivity, color customization, and layer blending is the difference between a flat, amateurish overlay and a compelling, integrated design element.
The Misconception of One-Click Realism
A frequent mistake when using texture packs is the expectation of instant perfection. Users often drag the brush across the canvas at full opacity, expecting a photorealistic brick wall to appear. The result is usually a repetitive, tiled pattern that breaks the illusion of depth. This approach ignores the fundamental strength of the Procreate Textures Brushes Bricks Walls collection: its pressure sensitivity.
These brushes are engineered to respond to the force of your Apple Pencil. A light touch yields a faint, weathered impression, perfect for distant backgrounds or subtle wear and tear. Pressing harder deposits more pigment, creating deep shadows and pronounced mortar lines. By varying your pressure, you mimic the natural irregularities found in real masonry. Ignoring this feature leads to uniform, mechanical-looking textures that fail to engage the viewer. To avoid this, practice drawing long, varied strokes where the pressure ebbs and flows, rather than tapping repeatedly.
Overlooking Color Customization
Another critical oversight is sticking to the default black or gray settings. Real-world bricks and walls are rarely monochrome. They range from warm terracottas and dusty ochres to cool slate grays and mossy greens. The beauty of this digital pack is that you can change the colour as you wish. Yet, many users neglect this flexibility, resulting in designs that feel disconnected from their overall color palette.
For instance, if you are illustrating a cozy cottage scene, a stark gray brick texture will clash with the warm lighting. Instead, sample colors directly from your environment layers. Use a deep, muted red for the bricks and a desaturated beige for the mortar. This attention to chromatic harmony ensures that the texture enhances the mood rather than distracting from it. Always experiment with hue, saturation, and brightness adjustments after applying the texture to ensure it sits naturally within your composition.
Neglecting Layer Blending Modes
Perhaps the most significant technical error involves layer management. Beginners often paint textures on a standard normal layer, which obscures the artwork beneath. This makes the texture look like a sticker placed on top of the image, destroying the underlying details. To integrate Procreate Textures Brushes Bricks Walls effectively, you must utilize blending modes.
Modes such as Multiply, Overlay, or Soft Light allow the texture to interact with the colors and values below it. Multiply darkens the underlying image based on the texture’s darkness, ideal for adding shadow and grit. Overlay increases contrast, making the bricks pop while preserving the mid-tones of your original drawing. By experimenting with these modes and adjusting the layer opacity, you achieve a seamless blend where the texture feels like an intrinsic part of the surface, not an afterthought.
Ignoring Scale and Perspective
Scale is a silent killer of realism. A common issue arises when artists use the same brush size for a close-up detail shot and a wide-angle landscape. In a close-up, individual brick imperfections should be visible. In a distance view, the texture should blur into a general tonal value. Using a high-detail brush for a background element creates visual noise and confuses the eye.
Before you begin, determine the viewer’s perspective. If you are creating digital paper for a web banner, a finer, less aggressive texture may be appropriate. For a poster featuring a gritty urban alleyway, you want bold, distinct strokes. Adjust the brush size accordingly. Furthermore, consider perspective. Bricks on a receding wall should appear smaller and compressed. You can achieve this by transforming the texture layer after painting, skewing it to match the vanishing points of your illustration. This small step adds a level of professionalism that separates hobbyist work from commercial-grade design.
Technical Requirements and Compatibility
It is essential to remember that you will need the application PROCREATE to open this file. These brushes are not compatible with Photoshop, Clip Studio Paint, or other desktop software unless converted through complex third-party tools, which often degrade their quality. Ensure your iPad or iPhone is updated to a version of Procreate that supports the latest brush engine features to fully utilize the pressure sensitivity and dynamic spacing.
Additionally, verify your device’s performance. While these brushes are optimized, applying multiple high-resolution texture layers on older devices may cause lag. Work efficiently by merging layers once you are satisfied with a texture’s placement, or rasterize them to free up processing power. This proactive approach prevents frustration during the creative flow.
Practical Applications Beyond Illustration
While illustrators are the primary audience, this pack offers immense value to marketers, bloggers, and small business owners. You can create unique digital paper for website backgrounds, social media posts, or product packaging mockups. Instead of relying on overused stock photos, you generate custom textures that align perfectly with your brand identity. For educators, these brushes can help create engaging historical or architectural diagrams that feel hand-drawn and approachable.
When using these textures for commercial projects, always check the licensing terms provided with the download. Most creators allow commercial use, but it is wise to confirm whether attribution is required. This due diligence protects your business and respects the intellectual property of the brush creator.
Making the Right Choice
Before purchasing or downloading any texture pack, evaluate your specific needs. Do you need hyper-realistic 3D effects, or stylized, hand-drawn aesthetics? The Procreate Textures Brushes Bricks Walls pack leans towards the latter, offering an artistic interpretation of masonry. If your goal is photographic realism, you might need additional photo-bashing techniques. However, for stylized art, concept design, and graphic elements, this pack provides an efficient, versatile solution.
Take time to test the brushes in a sandbox file. Experiment with different angles, pressures, and colors. Notice how the spacing affects the continuity of the brick lines. By understanding the tool’s behavior before starting a major project, you save time and avoid costly revisions. Ultimately, the value of these brushes lies not just in the files themselves, but in the skill you develop by mastering them. With practice, you will transform flat digital canvases into rich, textured worlds that captivate your audience.